×
Menu
Index

TaskTrak  - General Settings

 
It is important to note that TaskTrak settings are global - For example, TaskTrak settings made in the 'General Tab' apply to all TaskTrak users.
Individual user settings are controlled in the TimeTrak User Setup and Profile options.
 
TaskTrak  - General Settings
1

TaskTrak Enabled

To enable TaskTrak this setting needs to be ticked on.
2

Show TaskTrak Task Categories

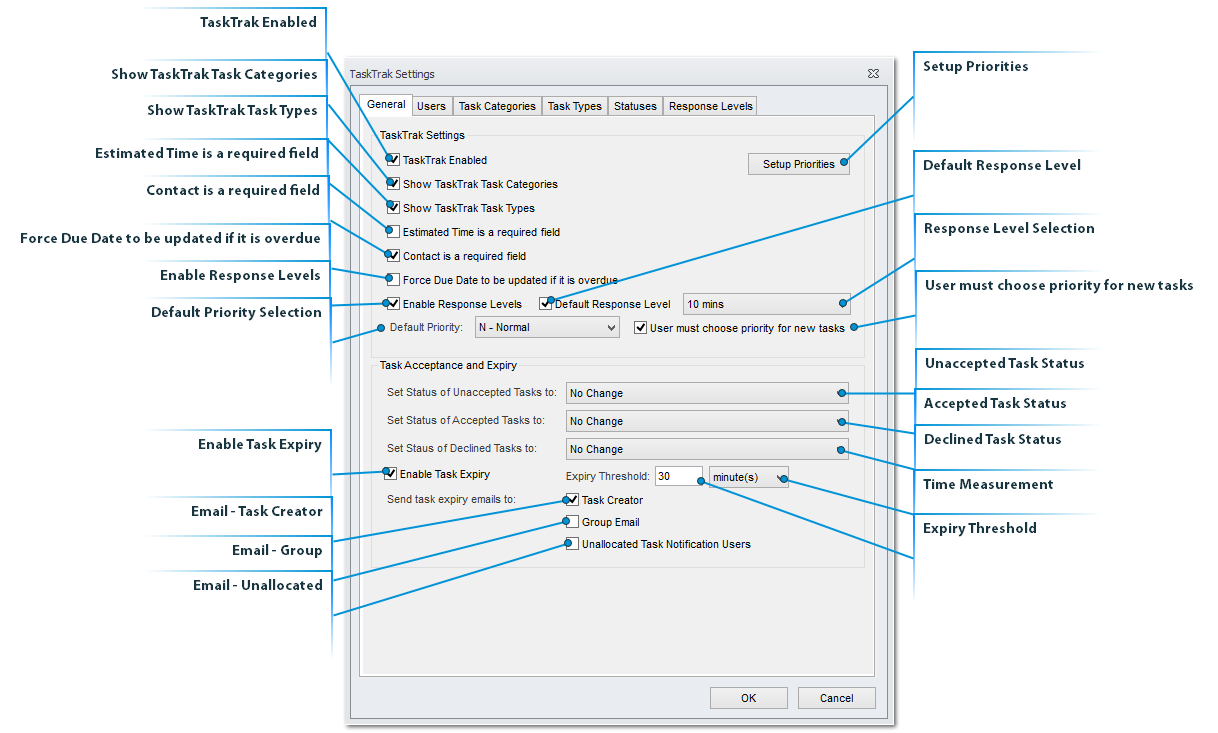
Tasks can have a level of identifying, reporting and grouping called Categories, this activates the tab in the TaskTrak settings  which allows users to set up the Categories and users will have a drop down box which they can select the Task Category from in the tasks.
An example of a category would be insurance work, warranty work or customer charge work.
3

Show TaskTrak Task Types

This is another level of identifying, grouping and reporting for tasks, this activates the tab in the TaskTrak settings which allows users to set up the Types and users will have a drop down box which they can select the Task Type from in the tasks.
An example of a type would describe the type of work being done, like installation, support, maintenance and design.
4

Estimated Time is a required field

Against a task users can set an estimated time they expect for the work to be completed.
This setting will make this field required or not.
5

Contact is a required field

If this setting is ticked on then a valid contact will need to be assigned to the task, if not then it is optional to select a contact for the task.
6

Enable Response Levels

Tick this setting on to activate the response level tab in the TaskTrak settings which allows users to set up the Response Level.
Then the response level can be assigned to the debtor account in MYOB Exo, this will require the extra field to be made visible against the debtor account.
For example, this is great when you have a client with a service agreement with a time frame that their requests will be followed up on.
7

Setup Priorities

Tasks can be prioritised and these can be weighted and customised if required.
 
To Add or Edit a Priority, enter in the relevant fields and rank.
 
8

Force Due Date to be updated if it is overdue

If the Tasks due date is overdue and this setting is ticked on then the user will be notified via an alert that they need to action the task by either updating the due date or closing the task.
9

Default Response Level

Tick on this field to set up a default response level.
10

Response Level Selection

11

Default Priority Selection

12

User must choose priority for new tasks

Tick this setting on if users need to select a priority for each newly created task.
13

Unaccepted Task Status

Select the status all unaccepted tasks should default to.
14

Accepted Task Status

If task acceptance is turned on then an accepted task will be set to a default status.
15

Declined Task Status

Select a Status for any Tasks declined by a another user.
16

Enable Task Expiry

If tasks need to expire if not actioned then this setting can be turned on.
17

Time Measurement

Select the time measurement.
18

Expiry Threshold

Set the amount of time before the expiry date/time set on the task to notify users the task is about to expire.
19

Email - Task Creator

Select this to email the task creator notifying them that the task has expired.
20

Email - Group

Select this to email the group notifying them that the task has expired.
21

Email - Unallocated

Select this to email the users  notifying them that the task is now unallocated.